HANDREARING GUIDE FOR THE BEGINNER.
By Kellie Stewart
Reasons for handrearing.
- The parents are not reliable when rearing their young
- Because you want to
- Parent birds pluck the chicks
- To have a tame bird for a pet
- To increase the number of babies produced each breeding season
- Some one letting mum out of the aviary up an extremely big pine tree….
The last reason on the list is when I tried my first step at hand rearing. Now I found myself with 4 Indian ringnecks to feed, as mum was perched at the top of the tree mentioned above. Luckily I had the basic set up and things didn’t get to stressful.
Your systems requirements should include the following.
- A reliable heat source such as are brooder or incubator
- Thermometer (to test temp of food before feeding)
- Feeding device. (bent spoon - syringe - eye dropper - crop needle - tube feeding ) I recommend the bent spoon for the beginner
- Feeding formula (e.g. Katies exact)
- Paper Towels (unbleached) don’t use handy towel that have been bleached. When they are wet from the droppings it causes a reaction which burns the chicks feet legs and under belly causing blisters and sometimes death.
This chart will give you some idea of feeding schedule for parrots of different ages.
|
Day 1-7 |
1½- 2½ hourly- last feed at midnight first feed at 5- 6am |
|
Day 7-14 |
2-3 hourly- last feed at 11pm first feed at 6am |
|
Day 14-21 |
3-3½ hourly- last feed at 11pm first feed at 6-00am |
|
Day 21-28 |
3½ hourly- last feed at 11pm first feed at 6-30am |
|
Day 28-35 |
4 hourly last- feed 10-30pm first feed at 6-30am |
|
Day 35-42 |
4-4½ hourly- last feed at 10pm first feed at 7am |
|
Day 42-49 |
4½-5 hourly- last feed at 9-30am first feed at 7am |
|
Day 49-56 |
5 hourly- last feed at 9-30am first feed at 7am |
|
Day 56-63 |
5-6 hourly- last feed at 9-00am first feed at 7am |
Please not this
is just a guide. This example is the feeding schedule for a rainbow
lorikeet.
THE
GOLDEN RULES OF HANDREARING.
· Keep feeding utensils and feeding area clean wash hands before feeding
· Keep the chick on the right temperature for its age
· Use fresh food never reheat old food from the last feed
· To make it easier on the bird when feeding go with the chicks chugging motion as he eats. Wait till he starts to beg for the next spoonful, and off you go again. Feeding food to fast can sometimes choke the bub do it in his/her time.
· Always use a thermometer to check the temperature of the food before feeding.
· If food has been reheated in the microwave stir very well and check temp again before feeding as hot spots occur when heating food in the microwave.
· Never feed if the crop has food remaining from the previous feed.
· Use a reliable good quality hand rearing formula and follow the quantity instructions of water to rearing food. Hand rearing mixes get thicker when left to stand. Let the food stand for a minute after mixing and add more water if its too thick before feeding
· Don’t mix chicks of different types in the same container. This was learnt by personnel experience. One rainbow lorikeet at 7 weeks of age chewed the toes legs and wing tips of three 4-week-old baby king parrots. Causing a blood bath of missing toes and injured babies.
· Don’t change your hand rearing food stay on the one you started with if you have to change introduce the new food into the diet gradually over the next few days by mixing the 2 formulas together gradually until the bird has been reverted to the new mix.
Temperature
guidelines for brooders in degrees Celsius
|
Day 1-7 |
34-36 |
|
Day 7-14 |
32-29 |
|
Day 14-21 |
29-28 |
|
Day 21-28 |
28-27 |
|
Day 28-35 |
27-26 |
|
Day 35-42 |
26-25 |
|
Day 42-49 |
24-23 |
|
Day 49-56 |
24-23 |
|
Day 56-63 |
Room temp 20-22 |
IMPORTANT NOTE
Place a small container of water in the brooder set up to create humidity in the environment, if this is not done the dry heat will dehydrate your chick very quickly. You can make your own brooder if you are electrical minded or buy one. Some people have had success by using the hot water cupboard. This is all right for older birds from 6-7 weeks onwards, as long as the temperature stays reasonably consistent.
FAQ FACT FILE:
WHAT TEMPREATURE DOES THE FOOD
NEED TO BE?
42-43 degrees Celsius
HOW DO I TELL IF MY CHICK IS
COMFORTABLE WITH THE TEMPREATURE IN THE BROODER?
If your bird is panting it
is to hot. If his feet and wingtips are cold then the baby is cold
I HAVE SEEN SMALL CONTAINERS
OF WATER IN REARING BROODERS WHAT IS THAT FOR?
To create humidity in the brooder, dry heat
will dehydrate the chick very quickly
WHY DON’T YOU FEED THE FOOD
FROM THE LAST FEED?
This greatens the chance of
crop problems developing.
WHAT IS CROP SLOW DOWN?
Crop slow down is when the
crop stops passing the food through. This can happen for various reasons.
Sudden change of hand rearing food, food being made to thick for the age of the
bird, fungal and bacterial infections. This also can happen if you feed the
food to cold or the bird is too cold.
WHAT DO I DO IF I GO TO FEED
MY CHICK AND THERE IS STILL A GOOD AMOUNT OF FOOD LEFT IN THE CROP FROM LAST
FEED?
Don’t panic… Think about it was the last feed bigger than usual did I make the food thicker. The first step is not feed any more food. Give the chick some warm boiled water with a small amount baking soda (a pinch in 2 teaspoons of water.) massage crop very very gently. This baking soda neutralizes any acid build up the water will help thin the contents of the crop so it can pass easier. Repeat in two hours time. If the crop does not appear to be empting there may be an underlining problem such as a fungal or bacterial infection. Then it would be best to seek help. (Vomiting is a good indication of a fungal or bacterial infection being present.)
*If you feed “Katies Exact” hand rearing food the chances of this happening is very rare I will say it is one of the best hand rearing food available.
WHAT IS GAS CROP?
Gas crop is a condition
where the crop fills with gases like a balloon created by bacteria. This can
happen with unhygienic food preparation, unclean feeding utensils, and feeding
old hand rearing formula. This condition is usually fatal to young birds.
WHATS A GOOD AGE TO START
HANDEARING A BIRD IF YOU ARE A BEGINNER?
At pinfeather stage as the first few
feathers are breaking through.
WHAT IS A GOOD BIRD TO TRY
YOUR HANDREARING SKILLS ON?
Cockatiel budgie, Indian
ringneck, scaly lorikeet
WHY IS MY CHICK GAGGING AND IT
CAN’T SEAM TO GET THE FOOD DOWN?
The bird is too cold the brooder temp needs
to be increased
WHY IS MY CHICK VOMITING?
You have feed the chick too
much or it may a fungal or bacterial infection.
HOW DO I TELL MY CHICK
IS FULL AFTER A FEED?
The crop should be nice and
rounded it should be quite noticeable that there is food in the crop it should
feel spongy. Small bubbles should appear each side of the neck once you see
these the chick has had enough to eat. These get harder to see as the chick
gets older but by then you should have it under control. If you have feed too
much the crop will feel hard. The crop is the buldge that forms in front of the
chick after a feed.
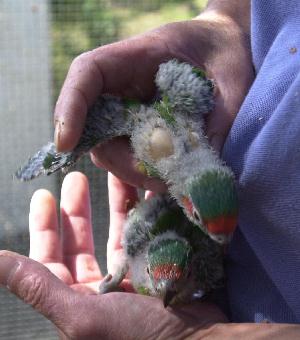
WHAT ARE THOSE STRANGE
BUBBLES ON THE BACK OF THE NECK AFTER A FEED?
They are part of the crop
and appear when the chick is full.
Musks after feeding, note the 'bubbles' on the back of the neck,
|
FEEDING CHICKS FROM DAY
ONE.
This is a general guide for
a beginner, I don’t recommend a person to try their first handrearing
experience on a bird so young, but as we know these things can happen.
·
With having chicks so
young you need a very reliable heat source, one that stays at a constant
temperature and can hold the heat of 35-36 degrees.
·
I feed birds this young
on a small bent salt spoon other people use eyedroppers and small paintbrushes.
·
The first thing you
should do when the chick hatches is clean the navel area where it has been
attached to the yolk sac of the egg. You can use an Antibiotic powder
(AUREOMYCIN ANTIBIOTIC POWDER) this can be applied with a cotton bud. You only
have to do this once. Not cleaning this area can result in an infection. The
antibiotic powder can be purchases from your vet.
·
Never attempt to aid
hatching if you don’t know what you are doing.
·
Leave the chick for 12
hour after hatching before giving the first feed. The reason for this is to
enable the chick to absorb the rest of the yolk that it was feeding on in the
egg.
·
The first 2 feeds should
consist of probotics and in lories and lorikeets glucose can be added. Then if
you are using katies exact the food should consist of one part rearing food
6six part water. The feeding temperature is very important here and as noted
before food should be 42 degrees.
·
For the first 4 or so
days it is very important to support the chick upright in the container.
Letting the head fall between the legs will in most cases causing the chick to
drown as the food spills over from the crop into the lungs. I roll a piece of
tissue and place it in the container so the chick tends to lean itself over it
while sleeping, and I prop the chick up by placing tissue around the little
fella.
·
You can leave you chick
for 5-6 hours during the night if you have past the stage of the 2 probotic
feeds and one food feed. Feeding for a newly hatched chick is between every 1½
-2 hourly for the first 3 days. Increasing feed times ½ hourly intervals, as
the chick gets older. Let the crop empty before giving the next feed
·
Keep a good level of
hygiene in all aspects of handrearing. I use antibacterial tablets used to
sterilize baby’s bottles to clean my feeding equipment.
*Probotics
are a form of electrolytes and are used to hydrate the newly hatched chick.
This can be purchased from various pet shops, not all pet shops will stock this
product, it would pay to locate these, before you need it along with the
antibiotic powder. These a good to have on hand as they are useful first aid
items for your birds in general.
FEEDING QUANTITIES
Feeding the right amount of
food for the age of the bird is most important. Each feed should consist of a
volume equivalent to 10-12% of the bird’s body weight.
HOW DO I KNOW WHEN TO START
THE WEANING PROCESS?
The chick will start to get
funny and play with the food at feed time. A good sign that a bird is ready to
start to go through the weaning is if you look at the wings of the developing
chick, you will find blood in the developing feather shafts and they re still
partly covered in wax. Once there is no more blood in the feather shafts and no
more wax surrounding the feathers, then the chick is ready to start being
weaned. Some birds are difficult and weaning turns into a long process,
depending on the bird. Lorikeets would be the easiest and cockatiels one of the
difficult ones, from my own experiences.
WEANING PARROTS
Offer food at different
parts of the cage or place where it is easy for the bird to see and get to.
Millet spray, apples soaked vogels bread and greens are a good tempter to get
the birds interest. For a while the chick may pull and nibble and not eat much
at all, then all of a sudden it happens. The chicks will still beg for you to
feed, keep in mind you should be still feeding them 3 times a day at this
point. Once you see they are getting the idea and food is being eaten, you can
lower the feeds to 2 times daily until they have got the idea to do it on their
own. Weaning parrots can take from 2 weeks to 2 months depending on size. I
also soak and sprout seed for the young I found it helps them to get the idea
on how to hull the seeds, as they are a lot softer to eat.
WEANING LORIKEETS
Make food available near a
perch. Lorikeets can eat for themselves from 6/7 weeks old. You still must
offer warm food and at the same feed times, but lory chicks take great delight
in lapping the wet mix it comes naturally to them. Watch they don’t gorge themselves
and over eat. I usually start the weaning process with lorikeets at 6/7 weeks
old. Honey water, apples, pears, a quickly dunked malt biscuit, dandelion and
soaked bread in honey water tempts any young lorikeet to have a nibble
including wet and dry mix used daily. The weaning process is the same as for a
parrot. Lorikeets at 7 weeks of age will take approximately a week to wean.
They learn faster if they are in a group of slightly different ages as they
copy each other.